softcite-dataset
Before the First Meeting
Before you can get started working on the Softcite project, you’ll need several things downloaded on your computer. These should have been attended to before your first lab meeting, but, to double check, please ensure that:
-
You have Chrome installed on your computer. You can download it here: https://www.google.com/chrome/index.html.
-
You have downloaded the Atom text editor. You can download it here: https://atom.io.
-
If you work on a PC, you will need to install PuTTY. If you don’t have it already, you can download it here: https://www.chiark.greenend.org.uk/~sgtatham/putty/latest.html.
-
You have signed up for and downloaded the Chrome extension called Hypothesis. You can sign up and download the extension here: https://web.hypothes.is. You might need to check your email at some point during the sign up process to confirm your account.
During the First Meeting
After you have those five items installed on your computer, you are ready to attend the first meeting. There is still more setup to do before you can start training or collecting data, however. On your first day you will continue to set up Atom, make accounts, and give yourself access to the lab server. Follow these instructions to continue your set up:
Sign Up for Github
If you do not have an account already, sign up for Github. You can sign up here: https://github.com/. Github is an online platform that allows users to share and document their code. It is built on the version control system, git. Git and Github are not the same thing, but Github adds functionality and a social/communicative aspect to git. Git itself allows you to keep track of versions of a file. We will discuss this more as a group.
Make a Lab Account
You will also need an account to access the lab server. Dr. Howison will help you create one of these. It might be helpful if your lab username and your Github username are the same.
Note: Students will need to be added to the allowed-users file for them to be able to access the repo on the lab server.
Download Atom Packages
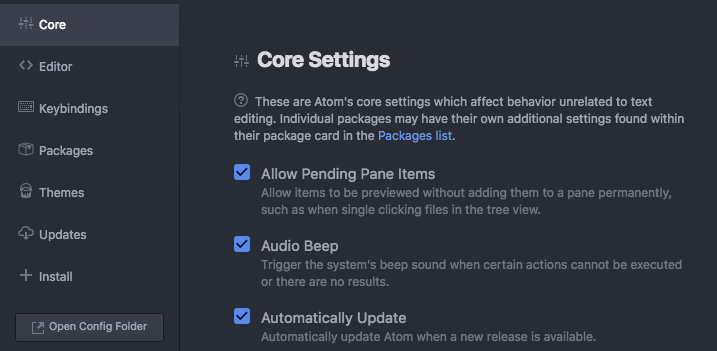
You will need to set up Atom so that it has all of the add-on packages we will be using. We will install two packages. To install the packages, in Atom, click on File (for PC users) or Atom (for Mac users). Then click on Settings (for PC users) or Preferences (for Mac users). A new menu will appear:

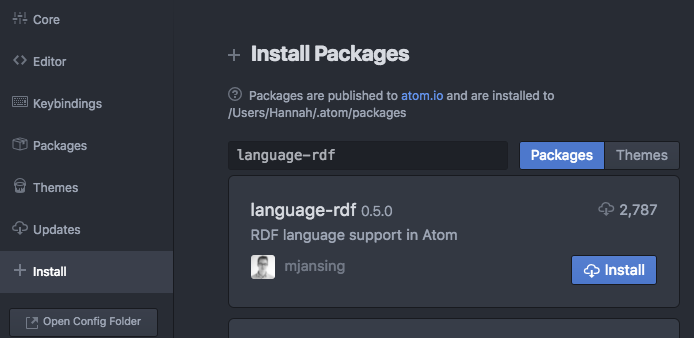
In that menu, click on Install. On that page, search for “language-RDF,” then click the blue Install button for the language-RDF result:

Repeat that process, searching for and installing the Remote-FTP package.
Customize Atom Preferences
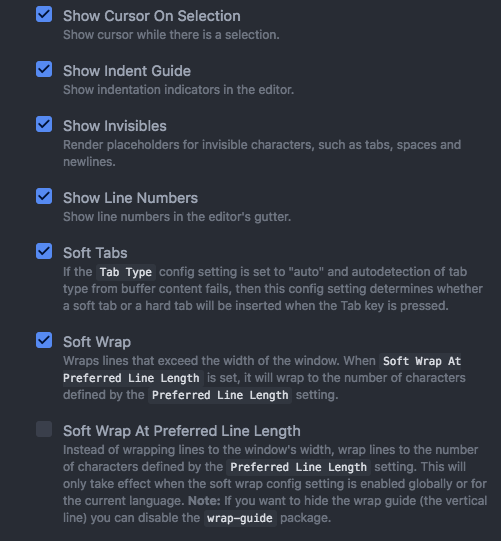
You will want to do a few things to make reading files in Atom easier on your eyes. You can adjust your preferences however you like, but we strongly suggest that you make the following changes to the editor. To make these changes, open your Preferences by clicking on File (for PC users) or Atom (for Mac users). Then click on Settings (for PC users) or Preferences (for Mac users). Then, in the menu that opens, click on Editor. Scroll down until you see the Scroll Sensitivity field and several check boxes below that. Adjust your settings to match these:

Set up Your .ftpconfig File
When working in the Howison Lab, you will be working on your own machine but editing files that are hosted on a lab server. As you make changes to those files you will use git to keep track of your edits, and then will push those edits to Github so that the rest of the lab can see your work as well. To access the files on the lab server, you will need to create an .ftpconfig file. You started this process when you downloaded the Remote-FTP package in the Download Atom Packages section. If you have set up your lab account as well, continue by following these instructions:
First, if you are setting up your .ftpconfig file off campus you will need to use the Cisco AnyConnect VPN to log in. If you are on campus, move on to the steps below. Instructions for setting up the VPN are available on this University wiki page. You will need to set up two-factor authentication using Duo as well—that wiki page includes instructions on how to do so. After you have downloaded the VPN you can follow the instructions here on how to use it.
-
If you are using a Mac: Use Spotlight Search to search for “terminal.” In the window that opens, enter the following command:
$ssh <lab username>@howisonlab.ischool.utexas.eduNote: When shown a command to enter into the terminal (also referred to as the command line), the command will be prefaced with the dollar sign symbol: $. This is not a key that you are meant to type yourself, instead it means, “Type everything after this.” For example, your login should look like this:

Enter your password after the prompt. As you type, it will not show you the characters. Continue by moving to step 3.
-
If you are using a PC: Open PuTTY. In the “Hostname” field, enter “howisonlab.ischool.utexas.edu” (do not use quotes yourself).
Enter your username and password in the terminal window that opens.
-
In Atom, make a new project by clicking the Atom or File menu for Macs and PCs, respectively. Then click Open Folder and in the window that opens, click New Folder. Name this new folder “howisonLabOnServer.”
Note: This folder must be on your computer, not hosted on the cloud. That means it cannot be a Dropbox folder or Box folder or hosted by any other service.
Note: You will need to keep this folder. Do not forget where you put it. Do not delete it until you are no longer working for with the Howison Lab.
-
In Atom, click on the Packages menu in the top navigation bar. In the dropdown that opens, click Remote-FTP. In the dropdown that opens from there, click on Create SFTP config file.
-
In the file that opened (called .ftpconfig), you will change several fields. Change the User and Password fields so that they match your lab username and password. Change the Host field so that it reads “howisonlab.ischool.utexas.edu” (do not use quotes yourself).
-
In your terminal window, as for the directory’s path (i.e. exactly where the folder you are in is located on the lab server) by entering the following command:
$pwdCopy what the terminal returns to you (e.g. /home/jlcohoon).
-
In Atom in the .ftpconfig file, paste what you copied from the terminal into the Remote field.
-
Save and close your .ftpconfig file.
-
In Atom, click on the Packages menu in the top navigation bar. In the dropdown that opens, click Remote-FTP. In the dropdown that opens from there, click on Toggle. Click the Connect button in the pane that just opened.
You are now viewing your empty directory on the lab Server! You will add a copy of the Softcite repository (collection of data, code, and documentation) to your directory in later steps. Each Research Assistant will have their own copy of the repository (AKA “repo”). We will use git and Github to share our work with one another.