softcite-dataset
Working on Softcite Data Files
This is the basic information you need to get into the Howison lab server and to commit your changes.
Accessing the Lab Server
This is how you can access the lab’s server where your work is stored:
Macs
If you are using a Mac: Use Spotlight Search to search for “terminal.” In the window that opens, enter the following command:
$ssh <lab username>@howisonlab.ischool.utexas.edu
Note: When shown a command to enter into the terminal (also referred to as the command line), the command will be prefaced with the dollar sign symbol: $. This is not a key that you are meant to type yourself, instead it means, “Type everything after this.” For example, your login should look like this:

Enter your password after the prompt. As you type, it will not show you the characters.
Windows (using Putty)
If you are using a PC: Open PuTTY. In the “Hostname” field, enter “howisonlab.ischool.utexas.edu” (do not use quotes yourself). Enter your username and password in the terminal window that opens.
Access From Off Campus
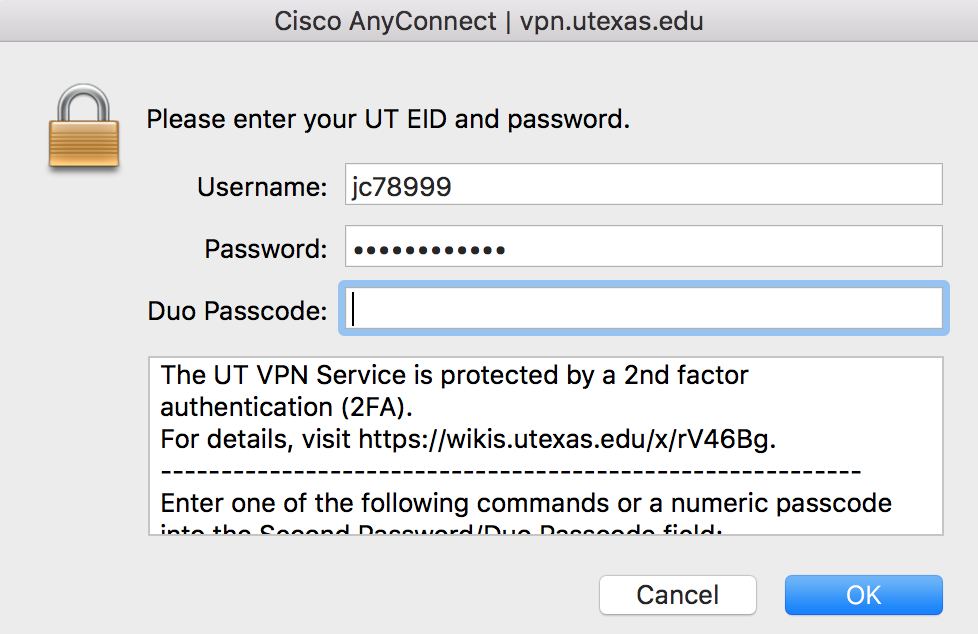
When you need to connect to the server from home, you’ll need to use a VPN. There is a university wiki page that includes instructions on how to do this. You will need to download CISCO AnyConnect, regardless of what kind of computer you use. You will also need to set up two factor authentication. The wiki page explains what you need.
When you are actually attempting to use AnyConnect, note that when you put your “Duo Passcode” in (in the empty field in the image below) you won’t be typing your password for a second time, but entering “push,” “SMS,” or “phone” according to the instructions below that field.

Were you visiting this section while setting up your .ftpconfig file? Return to those instructions by clicking here.
Moving to the Right Repo
Once you’ve logged onto the server, you’ll need to move to the correct folder. In the terminal, enter this command to change directories:
$ cd softcite-dataset/
Opening the Server in Atom
To edit your server files, you’ll need to open the folder that you made your .ftpconfig file in Atom. Then, you can open the FTP remote pane by going to Packages in the top navigation bar and clicking on ftp remote. Click on toggle in the dropdown that opens. Then, from the pane that opens, you can click Connect. You can collapse the pane that has your .ftpconfig file in it (the pane that says howisonLabOnServer at the top)—you won’t need that.
Pulling Upstream
As changes are made to the scripts and other changes are made to the Howison Lab repo, you will need to access those changes. To do so, you will need to pull upstream. If you are conceptually confused about why you would do this, read the explanation on the Understanding Git in our Context page. Follow these instructions to pull upstream:
-
In your terminal, ensure you are logged in and are in the softcite-dataset directory.
-
Execute the following command:
$ git pull upstream master -
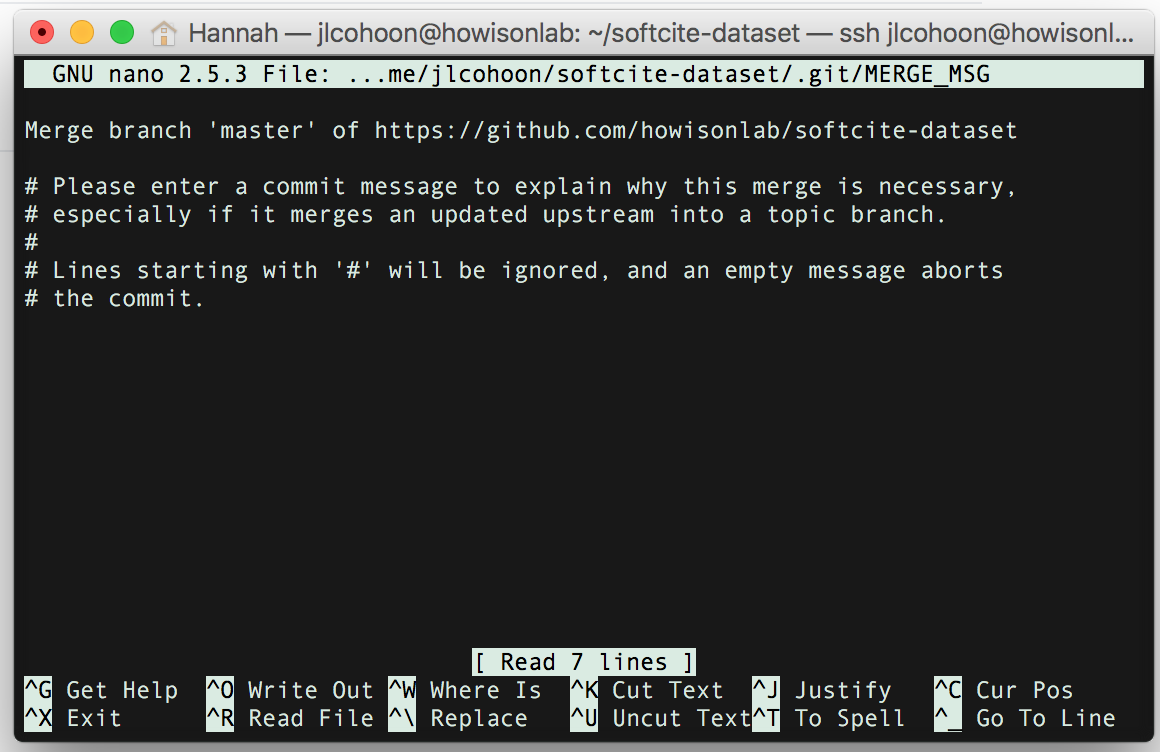
The terminal should show that it did some work. It may say you are up to date. It may say that it created a bunch of files. It also might show you a screen like the following:

If you see that screen, don’t worry! It’s just asking you to accept the merge of the changes it found upstream into your own working directory. Move forward by:
-
Type control+o (for both Mac and PC). This will change the screen slightly so that it asks you to enter a commit message. Ignore that and proceed to the next step.
-
Hit your enter key. This will change the options at the bottom of that screen. Move to the next step.
-
Type control+x. This will exit that screen.
When the merge is complete your terminal should be ready for your next command. The line above your curser should read, “Merge made by the ‘recursive’ strategy.”
If you see errors telling you about a merge conflict, you can ask for help or read more about them on the web. However, remember that you should only ever modify files that belong to you—don’t modify files that are in someone else’s individuals folder or in the code or docs folders.
Coding an Article
An example of a coded article can be seen here. That example has several in-text mentions as well as a reference. It is also formatted correctly—note that each block ends with a period and blocks are not nested within one another. Remember to use triple quotes for strings (i.e. text that isn’t “true” or “false”). Booleans (i.e. “true” or “false”) do not need quotes. Integers (e.g. 10 or 6) do not need quotes. Follow these steps to code an article:
-
You should have the coding scheme open in a separate tab or window.
-
Open the data file you are editing in Atom. There should be a comment near the top of the file that contains a URL. Enter that URL in your browser to open the article you will code.
-
Turn on the Hypothesis extension and make sure you are logged in. Read the article and highlight, using Hypothesis, any mentions of software that you find.
-
Return to your data file. If you found a mention of software in the article (referred to as an in-text mention), give it a name according to the instructions that are in the coding scheme. If you found more than one, copy the line you used to name the first one and paste it on the next line, changing the name of the second mention so that it says 02 instead of 01 at the end. Name each of the mentions you found in this manner. If you found no mention, delete the line asking you to name the mention and enter true for coded_no_in_text_mentions. An example of a data file for an article that had no mentions can be seen here. Refer to the coding scheme for more information.
-
Use your snippets to create an in-text mention block below the period that ends the article block (where you just entered the names of the mentions). This snippet, for an in-text mention block, is itb.
-
At the top of the in-text mention block you just created, change pmcidFIXME: so that it is the name of the first in-text mention (e.g. pmcid:PMC5304233_JC01). Refer to the coding scheme for more information.
-
Follow the coding scheme, working through the in-text mention block to replace the FIXMEs with your responses.
-
At the end of the in-text mention block, after the period, use your snippets to create a reference block if your in-text mention had a reference. This snippet, for a reference block, is refb. Replace the pmcid-citedFIXME: so that it has the name of the reference as you created it while coding the in-text mention (e.g. pmcid-cited:PMC5304233_Doe-2004)
-
Continue to create in-text mention blocks and reference blocks as needed. Follow the coding scheme to guide your responses.
-
Save your file, then check for errors and commit according to the instructions in the sections below.
Remember that you are only recording information about the sentence that contains the mention. That means that if one in-text mention of a piece of software contains a version number but a later mention of the same software has no version number, the second in-text mention block should say that there was no version number.
Remember that if multiple in-text mentions have the same reference, you only need to code that reference block once. If a second in-text mention has the same reference as an earlier mention, just provide that reference’s name as you created it for the first mention in the second mention’s has_reference code. In other words, you only code each unique reference once but can recall it multiple times throughout your data file.
Finally, remember that if you one sentence contains multiple mentions of software, you will code that sentence multiple times. Each time you will give it a separate name though the full_quote response will be identical. Your in-text mention blocks will differ from one another as you give the name of the software, creator, version number, etc.
Checking for Errors
Before committing, you will need to confirm that there are no problems with your files. You will run the command code/softcite-test, and repair any errors if necessary.
-
Check if there are any errors:
$ code/softcite-testIf a file has an error, it will be shown under “FAILURES.” In that section (i.e. just above where your cursor is ready to enter a new command) there will be a sentence that reads:
Failed: BadSyntax: Use python3 code/parseTurtle.py -f data/individuals--<username>/<filename>.ttlThis image shows an example:

If there are no errors, you will see a message that says how many items passed and how quickly. There will be no “BadSyntax” message.
-
To find out exactly where the error in that particular file is, copy the line that begins with
python3 code/parseTurtle.py… and run that as a command:$ python3 code/parseTurtle.py -f data/individuals-<username>/<filename>.ttlThe command will run and spew out something that ends with an error saying something like:
rdflib.plugins.parsers.notation3.BadSyntax: at line 330 of <>: -
In Atom, if this was a file you edited, visit the line number in the file (which was named after running the previous command—line 330 in the above example) and resolve the error, save, commit, and push as described below.
Committing Changes
When you need to save your changes, you will make a commit. The first step is to check what files have been changed. Then, add the files that are in your individuals folder (don’t add anything in the cache or anything you don’t remember modifying). Then double check you’ve added everything you need. Then make a commit and include a message. Finally, you’ll push your changes up to your Github repo. Step by step:
-
View which files were modified:
$ git status -
Add the files you want:
$ git add <name of modified file> -
View which files were modified to check you got everything:
$ git status -
Enter your commit message:
$ git commit –m “<message content>” -
Push commit up to Github:
$ git push origin master -
After you have completely finished coding an article, you can make a pull request. To do that, visit your repo on Github and click the “New Pull Request” button.
Requesting a New Article
When you have finished coding one article and committed your work, you can request another article to work on.
From the terminal, execute the following command:
$ python3 code/getNextContentAnalysisAssignment.py
A new file will be added to your individuals folder. You may need to right click on it and hit refresh to make the new file appear. The new file will contain the prefixes and article block for your new assignment.