sequenceDiagram
    participant upstream AS upstream<br />aka shared/project
    participant origin AS origin<br />aka fork
    participant laptop AS laptop<br /> aka local

    upstream ->>origin : github fork
    origin ->>laptop : git clone


    laptop ->>laptop : git branch
    laptop ->>laptop : edit/add/commit

    upstream ->>upstream : maintainer commits<br />or pull requests<br />from others merged

    laptop ->>laptop : edit/add/commit

    note over laptop : Work finished, need to<br />gather changes since clone

    upstream ->>laptop : git pull upstream
    laptop ->>laptop : resolve conflicts<br />git add/commit
    laptop ->>origin : git push
    origin ->>upstream : github pull request
20 Github collaboration
Exercises done in groups of three.
Incidentally George Simmel in early 20th century says that everything changes when you go from 1 to 2 people (a dyad), and then again going from 2 to 3 (a triad). He said that because at 3 people it’s the first time you can be outvoted :) Check it out.
20.1 Collaboration picture

In the image above we can see the overall situation when people are collaborating through a git hosting service like github.
At the top we see the “Github Cloud” and at the bottom we see our laptop. Everything we have done so far (edit-save-add-commit and branching) happens on the laptop.
In the Cloud we see two repositories. The one on the right called “Upstream” (or sometimes “Project” or “Shared”) is the space where all our work will collect. The one on the left called “Origin” is our cloud copy of the shared repository. You can think of a fork as a backup space for the repo on your laptop; the fork lives in your github account namespace.
There are 6 steps to this workflow (also depicted in diagram below)
We create a fork of the upstream repo. This happens on github.
Bring that fork down to our laptop where we can work on it. This is done using
git clonea command that is run on the laptop. We passgit clonethe URL of the fork.Use
git branchandgit checkoutto create a branch, then theedit-save-add-commitas usual.Synchronize using
git pull upstreamto get any work that has happened in upstream since you cloned your fork. Such work might come from the maintainers of the project doing their own work there, or the maintainers merging in pull requests from other contributors. This is quite similar to mergingmainto our branches if working locally.Use
git pushto move your new edits up to github. Note that they go to your fork, not directly to upstream.Create a
pull requeston github. We do this while looking at our fork. This lets the upstream repo know that you have work ready to contribute.
The pull request can then be merged by the maintainer of the upstream repo.
A PR is a request for the maintainer of the upstream repo to run a
git pullfrom your branch on your fork into their repository
20.2 Basic forking workflow setup
- Group of three: Contributor A, Maintainer, Contributor B.
Arrange your chairs so that you can see each others screens. That means sitting in a row so you can easily see what each other are seeing. Maintainer sits in the middle.
flowchart LR
  ContributorA---|left of|Maintainer---|right of|ContributorB
Maintainer creates new repository on github.
Contributor A and Contributor B log into github, find the new repository created by Maintainer and fork it.

- Contributor A and Contributor B should clone their fork repo to their working space.
Before running git clone, everyone needs to ensure they are in a folder that is not inside another repo. You can place repos anywhere you want. I suggest placing them in your home folder. You can be sure you are there by running this command (read as “cd tilde” because tilde is a shortcut for your home directory).
cd ~To be sure that you aren’t inside another repo you can run git status and you want to see a fatal error.
git status
fatal: not a git repository (or any parent up to mount point /stor/home)
Stopping at filesystem boundary (GIT_DISCOVERY_ACROSS_FILESYSTEM not set).
If you do not see the fatal error, then you need to move up in your folder hierarchy until you are not in a repo. Use cd .. or cd ~. If you still get that error and you are in your home folder, see FAQ for “I accidentally made my home folder a git repo” at Section B.2
The contributors will have their own github username in the fork URL. You can quickly copy that with this button on github.

Then clone your repository and change directory into it.
git clone <fork_repo_url>
cd <repository_name>- Establish remotes. Contributor A and Contributor B will specify the shared repository as “upstream”.
git remote add upstream <maintainers_repo_url>If setup properly then the git remote -v command will show four lines for Contributor A and Contributor B:
git remote -v
origin  <fork_repo_url> (fetch)
origin  <fork_repo_url> (push)
upstream <maintainers_repo_url> (fetch)
upstream <maintainers_repo_url> (push)
Note
Note that git automatically creates the origin remote as whatever URL was used with git clone.
Each exercise below assumes this setup as the starting point.
20.3 Sharing work and synchronizing
Requires three part repository setup as shown above in Basic forking workflow setup
The contributors are each going to do some work, then pass it up through their forks to the upstream shared repository. This will use git push and Github pull requests (which the Maintainer will see and approve). We will then use git pull upstream so that each contributor gets the work that the other has done.
Contributor A, Contributor B should create a new branch and switch to it (replace YOUR_ROLE_NAME with either contributorA or contributorB):
git branch YOUR_ROLE_NAME-new-branch
git checkout YOUR_ROLE_NAME-new-branch
Contributor A, Contributor B each create a file named after their role (ie contributorA.txt, contributorB.txt). You can use an editor to create and save the file, or you can create a file with some simple content using:
echo "A line of content" >> YOUR_ROLE_NAME.txt(replace YOUR_ROLE_NAME with contributorA or contributorB)
- Add and commit your new file.
git add YOUR_ROLE_NAME.txt
git commit -m "Contributing a file"- Push your new file. By default git push uses
originas the destination (so this new branch and file will go to your fork)
git pushYou may also see a message about having an upstream branch. Something like this:
git push
fatal: The current branch test-branch has no upstream branch.
To push the current branch and set the remote as upstream, use

    git push --set-upstream origin test-branch
You can re-run the command as given (copy from in Terminal).
Note
If you have trouble with GitHub authentication, remember that it is the email address associated with the GitHub account and the password has to be a PAT. That is the special password you copied from the GitHub site. See Chapter 19 for details.
The incoming contributions from Contributor A and Contributor B these files are now at their fork, and will need a Pull Request to move to the shared repo.
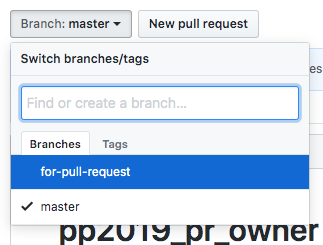
- Contributor A and Contributor B go to github and look at their own fork (if you’ve forgotten the URL you can use
git remote -vand look next toorigin. Github knows that the fork now has material that the shared repo doesn’t, and will make a New Pull Request button available.
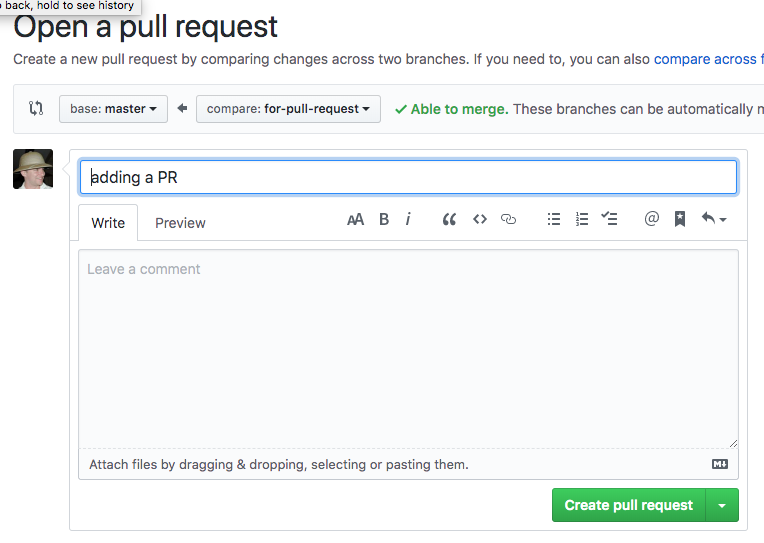
Since we created files with unique file names, these PRs will show up as “Able to be automatically merged”.
- The Maintainer should now refresh their page (so they are looking at upstream) and they will see a number next to the Pull Request tab:

The Maintainer can accept both pull requests, which will merge files into the main branch on the shared repo.

Now the contributors need to synchronize with the shared repo. They first have to switch to the main branch, then they can use git pull to bring the new files from the other contributor into their local repo.
- Contributor A and Contributor B should switch to main, then pull upstream.
git checkout main
git pull upstream main- Finally, Contributor A and Contributor B will push these new changes from the shared repo up to their forks.
git pushI’ve always thought it is a little strange that a contributor’s fork doesn’t distribute changes from upstream, but that new work from the shared repo gets to the fork via the contributor’s local repo on their laptop. After all, github knows the fork is connected to the shared repo … but this is the roundabout way it works.
20.4 Once more, but with maintainer editing as well.
In the exercise above you may have noticed that the maintainer was not editing and contributing files, only ContributorA and ContributorB were.
The maintainer is the owner of the shared repository (which we call “upstream”). For this reason they can work directly in that repository, and they don’t need to make their own fork. The maintainer can directly use git clone on the shared repository.
Note
For the maintainer upstream and origin are the same; The Maintainer only has one remote set up.
The maintainer can still create pull requests (and they should do). This places them on an equal footing with other contributors, so everyone else can follow the work and comment on it. Maintainers can make a pull request from a branch in their repository to another branch (usually main/main).
This gives us another insight: a Github pull request is from a branch to another branch; it doesn’t matter if those branches are in forked repos or in the same repo.
- Maintainer should clone the shared repo
git clone MAINTAINER_URLIf the maintainer then runs:
git remote -vthey will see:
origin  MAINTAINER_URL (fetch)
origin  MAINTAINER_URL (push)
So … for the maintainer (the owner of the shared repo) the shared repo on their clone is called origin, but those the maintainers (who are working through a fork) it is called upstream. This can be a little confusing. Remember that when we run git clone git automatically sets up a remote called origin.
- Maintainer creates a branch and changes to it:
git branch new-maintainer-branch
git checkout new-maintainer-branch- Maintainer creates and saves a file called ‘maintainer.txt’
You can do this with the same command that the Contributors used:
echo "Content for the file" >> maintainer.txt- Maintainer pushes up to the shared repo. Remember: GitHub email/PAT token as password. See Chapter 19 If you see a message about
--set-upstreamyou will also have to copy that the command in the error message to set up the branch on the remote repo.
git pushSince the maintainer is working on a new branch, this creates a new branch on the shared repo on github.
- Maintainer views the new branch on github, creating a pull request.
This pull request is a request (to themselves) to bring the code from the new-maintainer-branch branch to main.
ContributorA and ContributorB should find the new PR (on the shared repo) and make comments (e.g., “Hey, looks good”).
The Maintainer should merge the branch and close the PR.
Everyone should update their own local repo (on Rstudio). First, everyone needs to switch to main (because that is where the PRs are merged to).
git checkout mainThen obtaining the changes, differs slightly between roles:
- Contributors (who are working through a fork) will need to get the changes from upstream so they need to pull from upstream main, then push to their forks
git pull upstream main
git push- The maintainer (who cloned the shared repo) will just need
git pull. They don’t need to push because the changes are already in the repo they cloned from.
git pull20.5 Generate merge conflict
(If starting here, confirm that your Group of three has the setup in Basic forking workflow setup as the starting point.)
The point of this exercise is to intentionally create conflicts in editing, to demonstrate how they show up in Pull Requests.
- Maintainer should change to the main branch on their local repo.
git checkout main- Maintainer should then create, add, commit, and push a file called
animals.txtwith this content:
lion
tiger
leopard
turtle- Contributor A and Contributor B should synchronize to receive this file.
git pull upstream main- Contributor A and Contributor B should both create and switch to a branch.
git branch animal-branch-CONTRIBUTOR_NAME
git checkout animal-branch-CONTRIBUTOR_NAME
5, Contributor A and Contributor B should each edit the animals.txt file by adding their name to the first line in the animals.txt (so it reads lion contributorA or lion contributorB). They add, commit, push to their forks.
Note
Note that these edits are incompatible, so they will generate a conflict when we try to merge them below.
They are incompatible because git can’t automatically merge them. Git works line by line and is quite smart (able to notice the insertion of lines, for example) but some merging of work needs human attention.
Contributor A and Contributor B should then go to github and look at their animal-branch on their forks. They should create a pull request by hitting the ‘New Pull Request’ button. Note that the pull request’s may not say “Able to automatically merge” (but go ahead and create the PR anyway.)
With everyone looking at Maintainer’s computer, Maintainer should refresh the github page for the shared repository and will see two pull-requests in the pull-request tab.
The maintainer should merge contributorA’s branch. This should merge cleanly since contributorA directly edited the lion line that the maintainer wrote.
However, the second pull request will create a merge conflict. So the maintainer will have to resolve the conflict.
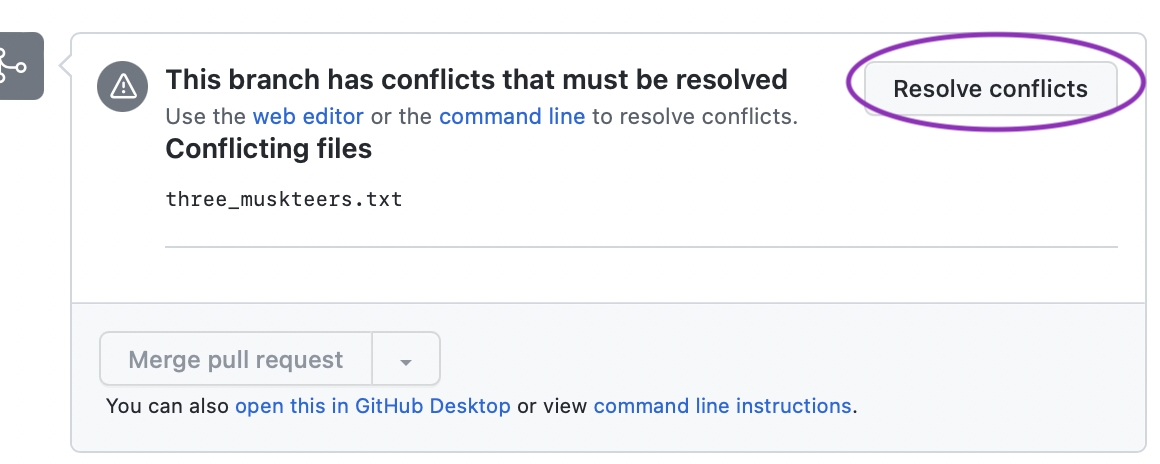
20.5.1 Resolving merge conflict
For small edits like this, we can edit the file on the github website.
The maintainer can choose whatever contributions they want:
- the original line
- the line from ContributorA
- the line from ContributorB
- Both lines
- Any other decision they make
To show a conflict, git inserts special lines into the file, using these characters: <<<<< ======== and >>>>>> While those are present, git will not let us continue.
Note
This way of showing a comparison between files is called a diff. You can read more about diffs. e.g., A tutorial on diff and diff format
To resolve the conflict we have to remove those lines. As long as they are gone, git will accept whatever is in the file as the new desired state. Git is only working at the syntax level, it does not check the semantics of the file (e.g., whether the code runs, or whether the resulting document is readable or logically consistent.)
The maintainer should see the file marked with a conflict like:
<<<<<<< HEAD
lion contributorA
=======
lion contributorB
>>>>>>> animal-branch-contributorB
tiger
leopard
turtle
We can read this as follows:
The code in HEAD has “contributorA” next to lion. But the code in animal-branch-contributorB has conflicting code for that line, showing “contributorB” next to line.
The maintainer should go ahead and remove the <<<<< ======== and >>>>>> lines, then save the file.
To let git know we are done resolving a conflict we need to then git add and git commit that file. If we are editing on GitHub that is done automatically for us.
- Each person should then synchronize their local repos.
For the Maintainer that just means git pull (since they have a direct clone of upstream).
For Contributor B and Contributor A they have to first get the changes in upstream, then push them to their fork.
git pull upstream main
git push
20.6 Deleting branches
We have been using branches as temporary working areas, intended to be used, merged, and then deleted. Later we will discuss longer lived branches (such as a staging or dev branch).
For short lived branches, though, we usually want to delete them when they are merged. GitHub offers that as an option after a PR is accepted.
We can also delete a branch on our local repo, then push that change up to GitHub.
git branch -d localBranchName
git push
Or we can do this with a single command:
git push origin --delete remoteBranchNameThe maintainers should go ahead and delete their branches and push to GitHub. Note that we don’t need to delete the contributor’s branches from upstream because they never went there (the PR asked to bring the changes on the branches directly into the main branch on the shared repo).
20.7 Exercises
Rotate your group, repeating the animals conflict exercise. When you change maintainer you will need to repeat the repository set up (use entirely new repos on GitHub). Use edits to different lines in the animals file.
Experiment to find out what happens when a contributor adds additional commits to a branch on their fork, after they have opened a PR.
Experiment to find out what happens if contributors don’t synchronize their local repo after having their PR accepted.