sequenceDiagram
participant GitHub_main AS GitHub main
participant local
participant local_new AS local new-feature
participant GitHub_new AS GitHub new-feature
GitHub_main ->>local : git clone
local ->> local_new : git checkout -b new-feature
local_new ->> local_new : edit/add/commit
local_new ->> GitHub_new : git push
GitHub_new ->> GitHub_main : Create/Merge Pull Request
GitHub_main ->> local : git checkout main / git pull
19 GitHub solo
19.1 Warmup exercise
Thus far your repositories have all been in your local filespace. This is often on a laptop, although for consistency this semester as we learn, we have been creating and using repos on edupod.
Even when working on one’s own (solo), it can be convenient to have a backup in the cloud. Git hosting services provide this. Examples include Github, GitLab, and BitBucket. As we will see later, these services also provide a platform for collaborating with others, but they work just as well as a backup for solo work.
19.2 Create a GitHub account
You will need to have a working GitHub account. You are welcome to use an existing Github account (if you happen to have one), or you can create one just for this course (a “throwaway”) or you can use your real name and plan to retain this account for your professional life. Whichever you choose you will need a working email address associated with the account (to confirm and see the notifications).
19.3 Create a repository on GitHub
Once you are logged into GitHub you can create a repository using the “New Repository” button (which is usually green colored).
You will need to give two things:
A repository name. I suggest that you use a prefix of
i320d-for all the repos used in this class. That will ensure you can easily clean them up later.Be sure to select “Add a README file” under the Initialize this repository with … section.
Once you’ve created the repository you will see a “Quick Setup” page. This shows you the URL of the repository that you’ve created. This is how mine looks:

You should copy the URL using the little grey box-on-box on the right.
19.4 Clone the repo to your local space
Now that we have an empty repo on Github, we can bring it down to our local space. This uses a git command called git clone.
Go to the Terminal on edupod.
Before running git clone, everyone needs to ensure they are in a folder that is not inside another repo. You can place repos anywhere you want. I suggest placing them all into your home folder on edupod. You can be sure you are there by running this command (read as “cd tilde” because tilde is a shortcut for your home directory).
cd ~To be sure that you aren’t inside another repo you can run git status and you want to see a fatal error.
git status
fatal: not a git repository (or any parent up to mount point /stor/home)
Stopping at filesystem boundary (GIT_DISCOVERY_ACROSS_FILESYSTEM not set).
If you do not see the fatal error, then you need to move up in your folder hierarchy until you are not in a repo. Use cd .. or cd ~. If you still get that error and you are in your home folder, see FAQ for “I accidentally made my home folder a git repo” at Section B.2
Then clone your repository and change directory into it.
For my example repo in the image above this would be:
git clone https://github.com/jameshowison/i320d-test1.git
cd i320d-test1
You will need to replace the repo URL and the repository name to match yours. The general form looks like this (but you replace the <repo_url> and <repository_name> placeholders.)
git clone <repo_url>
cd <repository_name>
19.5 Edit/Save/Add/Commit as usual
Now we can do our usual git stuff: We can edit a file, save it, then use git add and git commit -m "Some message" to store our new version in git.
As usual, here is a command that simulates editing and saving a file (which you can also do through the RStudio interface):
echo -e "\n\nA new line in README" >> README.md
git add README.md
git commit -m "Added line to README"
Note that you may have to set the user.email and user.name fields. These do not have to match up with your GitHub username and/or email.
git config --global user.email "you@example.com"
git config --global user.name "Your Name"
Now we are ready to send data back up to GitHub. While the repo is public readable, it is not public writeable. If we try to send things up using the git push command we will see this error.
git push
remote: No anonymous write access.
fatal: Authentication failed for 'https://github.com/jameshowison/i320d-testing2024.git/'
Only people with special permission can add things to the repository. So we have to set up authentication. To clear anything out (and avoid being asked for these details a lot) we need to run:
git config --global credential.helper 'cache --timeout=10000000'19.6 Obtain special password for commandline git (PAT)
Your password for GitHub will give you access to the GitHub web interface, but to connect git on the commandline to GitHub we need a Personal Access Token (PAT). You can think of this as a special use password. Go to https://github.com/settings/tokens (You will need to be logged into GitHub).
- Click “Generate token”.
- Chose “Generate New Token (classic)” from the drop down (not Fine-grained)
- Select “repo” “workflow” and “user” permissions and then hit “Generate Token”
You will then be able to copy the PAT. You need to keep this somewhere you can copy from in class. I put it into my password manager (I use 1password). Note that this gives full access to your GitHub account, so if you have work stuff or other things in there, come talk to me or use a “fine-grained access token” scoped only to the repos for this class.
Note
Windows users may have trouble pasting the PAT into the terminal. You may have to use the right-click menu and then choose paste.
Similarly, right-click can also work for copy in the terminal windows.
Caution
GitHub will only show a PAT a single time. So you must store this somewhere you can copy it from when needed. It is a password, so store it with your other passwords.
You should be using a password manager. Examples include 1password, LastPass, Dashlane, or perhaps a password manager associated with your browser. So store it there.
If you lose the PAT, you can log into GitHub and generate another (but remember to copy and save it this time).
19.7 Send your changes up to GitHub
The git push command will move any new work from your local repo, up to GitHub.
git pushgit will ask for your username/password. You should use your GitHub username, but the PAT when asked for the password. Your regular GitHub password will not work. You have to use the PAT you created in the previous step. If you didn’t copy it down, you can create a new one, don’t forget to store it somewhere so that you can copy it for use in class.
By default you will have to re-enter this username/PAT any time you haven’t run a git push command for 15 minutes. More details in the FAQ on this in Section B.1.3 which gets you to run:
git config --global credential.helper 'cache --timeout=10000000'19.8 Go to GitHub to confirm
Now head to GitHub to confirm that your changes made it up to the server. You can use git remote -v as a shortcut to find the URL of the repo, if it isn’t still open in your browser. See Section B.1.4 for more.
19.9 Working with branches locally and remotely
We can create branches locally, and then push them up to GitHub.
git branch test-new-branch
git checkout test-new-branch
echo "Change on new-branch" >> README.md
git add README.md
git commit -m "change on locally created branch"
Now we have a branch locally, but that branch is not in the repo on GitHub. This means we may see a message about needing to set an upstream branch. Something like this:
$ git push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
fatal: The current branch test-branch has no upstream branch.
To push the current branch and set the remote as upstream, use

    git push --set-upstream origin test-branch
You can copy that suggested command within terminal and run it. This tells git to create your new branch on the origin remote.
You should see something like:
:~/workspace/i320d-testing2024$ git push --set-upstream origin test-new-branch
Enumerating objects: 5, done.
Counting objects: 100% (5/5), done.
Delta compression using up to 16 threads
Compressing objects: 100% (2/2), done.
Writing objects: 100% (3/3), 315 bytes | 35.00 KiB/s, done.
Total 3 (delta 0), reused 0 (delta 0), pack-reused 0
remote:
remote: Create a pull request for 'test-new-branch' on GitHub by visiting:
remote:      https://github.com/jameshowison/i320d-testing2024/pull/new/test-new-branch
remote:
To https://github.com/jameshowison/i320d-testing2024.git
 * [new branch]      test-new-branch -> test-new-branch
branch 'test-new-branch' set up to track 'origin/test-new-branch'.
(Remember if you see a fatal: Authentication failed message follow instructions here: Section B.1.2)
19.10 Find your branch on GitHub, create and merge Pull Request
On GitHub you can now find your branch. You have to view your repo on GitHub (remember Section B.1.4 for shortcut to find URL.)
Once you see your repo on GitHub, you can find your branch using the Branch drop-down.
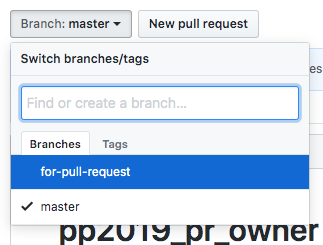
Select that and you will see a “Compare & pull request button”

When you click the green button you will see:

Notice the purple circle that shows base: main <-- compare: new-feature. Notice that the arrow points right to left. The destination of the PR comes first (here it is main) and the place we are merging from comes second (here it is new-feature).
The interface shows that the branches can be merged automatically. This means that the changes in the new-feature branch would not cause conflicts if merged into main.
You can go ahead and Create the PR.
This will lead to a PR page, where you could chat about the suggested changes.
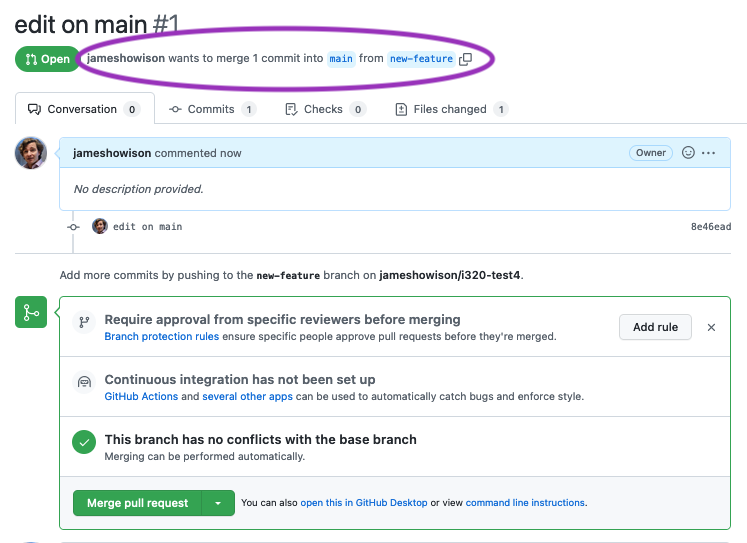
Notice the sentence in the purple circle: jameshowison wants to merge 1 commit into main from new-feature that is a useful succinct summary of what a PR is: it is a request to merge a set of commits from one branch into another.
If you hit the “Merge Pull Request” button GitHub will merge the branch to main, close the PR, and suggest that you delete the branch (which you can do; all the commits from that branch are now on main/master).
19.11 Synchronize your local repo
All the PR steps have happened on GitHub only, so they aren’t yet reflected in your local repo. We have merged new-feature to main on GitHub.
At this point you need to synchronize by first switching to main:
git checkout mainand then get changes from the remote
git pullYou will see something like:
~/workspace/i320d-testing2024$ git checkout main
Switched to branch 'main'
Your branch is behind 'origin/main' by 2 commits, and can be fast-forwarded.
  (use "git pull" to update your local branch)
~/workspace/i320d-testing2024$ git pull
Updating 441124e..8ba5e91
Fast-forward
README.md | 1 +
1 file changed, 1 insertion(+)and if you run
git statusyou will see that everything is synchronized. (origin/main means the branch up on GitHub)
~/workspace/i320d-testing2024$ git status
On branch main
Your branch is up to date with 'origin/main'.

nothing to commit, working tree clean